How To Make Simple Sushi Rolls That Look Impressive
Inside: This recipe for easy sushi rolls is perfect for beginners! Includes step-by-step instructions for making cucumber sushi rolls.

I forked over a lot of money at the sushi counter of my store before I realized how easy they are to make myself.
This is also a great project for kids and a nice way of fitting in some extra veggies in everyone’s day.
What You Need to Make Homemade Sushi Rolls


Here are the supplies you’ll need. You should be able to find all of these in the supermarket.
- sushi rice (sushi-grade rice is important to create the “stickiness” needed for these rolls)
- nori sheets (roasted seaweed)
- bamboo rolling mat (about $2)
- rice vinegar
- veggies: carrots and cucumber
How to Make Sushi Rice
Follow the directions on the back of the rice package (1 1/2 cups of uncooked rice will yield plenty of rice to make 4-6 rolls).
While the rice is cooking, combine 6 tablespoons rice vinegar, 2 tablespoons sugar, and 2 teaspoons salt in a small saucepan over medium heat. Stir mixture just until the sugar dissolves (do not boil). Remove from heat and let it cool until ready for use.
When the rice is cooked, pour the rice vinegar mixture over the rice and fluff using a fork. Rice is the stickiest (and easiest to roll) when it is completely cool. A quick way to do this is to spread it out onto a baking sheet. You can also refrigerate the rice overnight if you want to make sushi rolls the next day.
How to Assemble a Sushi Roll
Here is an easy sushi recipe that uses cucumbers and carrots. This is a good sushi recipe for beginners! Feel free to add avocado, imitation crab meat, or other fillings.
Prepare the filling. Slice veggies into thin matchsticks.

Lay the bamboo mat on a flat surface. Cover with a sheet of plastic wrap, allowing a 1-inch overlap from the mat. Place a nori sheet over plastic wrap with the rough side of the nori facing up.

With wet hands, grab a handful of rice and place in the center of the nori. Press the rice out towards to edges of the nori sheet, grabbing more rice (and water) as you go. The rice filling should be 1 cm thick and 1/2-inch from the border.

Sprinkle a bed of sesame seeds over the rice.

Add one more sheet of plastic wrap over the rice coated with sesame seeds, overlapping 1″ on all sides.

Carefully place one hand on top and flip the sheet so the plain side of the nori is facing up. Then remove the top layer of plastic wrap. Add your desired amount of ingredients to the center of the nori.

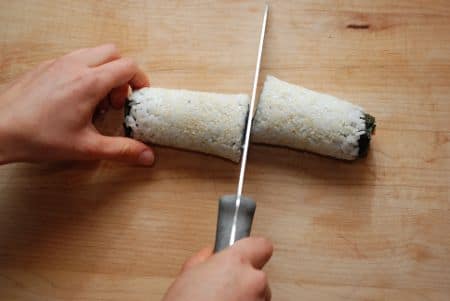
Fold the nori over the ingredients and tuck the edge underneath. Continue to roll using firm pressure and peeling back plastic wrap and mat as you go. Dab cold water on the edge of the nori to seal the roll. Slice roll in half and then cut into 6-8 pieces.


Recipe Card for Simple Homemade Sushi Rolls

Simple Homemade Sushi Rolls
Want to learn how to make homemade sushi rolls? These simple sushi rolls are made with cucumber and carrot, rolled in fresh sushi rice and nori sheets. Perfect for a takeout-at-home style meal!
Ingredients
- 1 1/2 cups medium-grain sushi rice
- 2 cups water
- 6 tablespoons rice vinegar
- 2 tablespoons granulated sugar
- 2 teaspoons salt
- 1 large cucumber, peeled and seeds removed
- 2 large carrots, peeled
- Sesame seeds
- 4-6 sheets nori
Instructions
- Make the rice by following the directions on the back of the rice package.
- While the rice is cooking, combine rice vinegar, sugar, and 2 teaspoons salt in a small saucepan over medium heat. Stir mixture just until the sugar dissolves; do not boil. Remove from heat and let cool until ready for use.
- When the rice is cooked, pour rice vinegar mixture over rice and fluff using a fork. Allow rice to cool completely by transferring to a baking sheet.
- Slice veggies into thin matchsticks.
- Lay the bamboo mat on a flat surface. Cover with a sheet of plastic wrap allowing a 1-inch overlap from the mat. Place a nori sheet over plastic wrap with rough side of nori facing up.
- With wet hands, grab a handful of rice and place in the center of the nori. Press the rice out towards to edges of the nori sheet, grabbing more rice (and water) as you go. The rice filling should be 1 cm thick and 1/2-inch from the border.
- Sprinkle a bed of sesame seeds over the rice.
- Add one more sheet of plastic wrap over the rice coated with sesame seeds, overlapping 1" on all sides. Carefully place one hand on top and flip the sheet so the plain side of the nori is facing up. Then remove the top layer of plastic wrap.
- Add your desired amount of ingredients to the center of the nori.
- Fold the nori over the ingredients and tuck the edge underneath. Continue to roll using firm pressure and peeling back plastic wrap and mat as you go. Dab cold water on the edge of nori to seal roll. Repeat with remaining nori until you run out of ingredients!
- Slice roll in half and then cut into 6-8 pieces. Serve with soy sauce.
Nutrition Information:
Yield: 6 Serving Size: 1 rollAmount Per Serving: Calories: 226Total Fat: 2gSaturated Fat: 0gTrans Fat: 0gUnsaturated Fat: 1gCholesterol: 0mgSodium: 720mgCarbohydrates: 48gFiber: 1gSugar: 6gProtein: 4g


Thanks Sally for a fabulous tutorial! I wish I’d seen this before I made my sushi rice. I like how your recipe for sushi rice is for the amount of sushi rice you make when following the package. The other recipes I found out on the web were for way more rice. And thanks for the tip about adding water on the edge of the roll to seal……noted and will try that tonight. Thanks!
I have always thought sushi was a complicated dish to make, but you have made it seem a much easier process. I am going to give this a try and experiment a little. I haven’t got a sushi mat, so I will use plastic wrap as you suggest. I have a good chef’s knife, so I reckon I can make something presentable.